
Within this installment of Tutorial Tuesday, I'll be discussing quick wins with Image link building.

Link building through images is comparable to mention backlink building, for the reason that you’re searching for example of somebody utilizing an image connected together with your company, brand, or website. After that it’s as easy as requesting a hyperlink. A great tactic at the beginning of an offer, although reverse image searches ought to be run periodically within a campaign too.
So, without further ado, here's quick tutorial on Image link building.

Next, you've four different choices to look a picture:


Link building through images is comparable to mention backlink building, for the reason that you’re searching for example of somebody utilizing an image connected together with your company, brand, or website. After that it’s as easy as requesting a hyperlink. A great tactic at the beginning of an offer, although reverse image searches ought to be run periodically within a campaign too.
So, without further ado, here's quick tutorial on Image link building.
Step 1: Create a list of company images
The initial step you have to take would be to gather a summary of all images highly relevant to your organization, brand, or website. A few examples of these kinds of images include:
- Logos – old and new
- Branded imagery
- Product photos
- Drawings
- Graphics
- Illustrations
- Cinemegraphs
- Proprietary images
- Corporate headshots
- Company buildings
- Etc.
You should be thorough when generating their list as you would like to incorporate every image you believe other sites may be using online. It is best to take the time to search a picture and discover nobody is applying it, instead of assume a picture is not in use and lose out on potential link equity from individuals who're indeed utilizing it.
Step 2: Search for images
Once you have produced your listing of images others may be using, the next thing is to look for individuals images and discover where you have used them on the web.
The easiest method to find these images is to apply reverse image search. There's a couple of easy choices for conducting a reverse image search - (which we will cover a little later on).
Google image search is fairly straightforward, but this is a quick walkthrough:
First, you have to visit - http://images.google.com/

- Drag and drop
- Upload an image
- Copy and paste the URL
- Right click w/ Chrome extension
Drag and Drop
The very first option involves simply dragging a picture on the internet or perhaps your computer and shedding it in to the search engine.

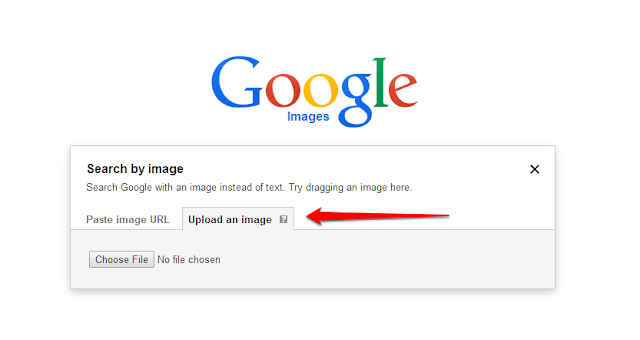
Upload an image
The 2nd option involves uploading a picture out of your computer to look. To get this done, just click your camera icon around the search bar.


Copy and paste URL
The following option involves copying the Link to a picture you’ve located on the web. Simply right-click the image and choose copy URL. Next, return to Google image search and click on your camera icon, however this time select “Paste image URL”

Another reverse image search tool that's simple to use is TinEye.
You've two options when looking for your image within TinEye - upload your image or enter in the image’s URL.

Both options works also it really just depends upon if you possess the images on your pc already or otherwise.
Listed here are the outcomes I recieve when uploading a headshot of The First Page Power Chief executive officer Jon Ball:

You can observe how impressive TinEye is, because it looked over five billion sites in under three seconds and located nine places where Jon’s headshot is turning up.
TinEye gives you links where the look has been used.

By using these links you are able to rapidly find out if the website making use of your image is linking backOrthe look source.
Both TinEye and Google image search could be helpful for tracking lower your images on the internet, but there's yet another tool which you can use that’s slightly different.
As pointed out before, that tool is Image Raider.
Image Raider is yet another reverse image search tool, but differs from another two because it is automated and can be used as ongoing searches of the images. This is very useful because it will inform or no sites make use of your images later on, meaning more link possibilities. Image Raider is comparable to Google Alerts, however for images.
Image Raider provides you with four different choices for uploading your images:
Step 3: Compile an outreach list
The next thing is to compile an outreach list, although ideally you will be carrying this out while positively tracking your images over the web.
Their list includes the websites making use of your images that you simply feel present the very best backlink building chance.
First, make certain you discover the best person to make contact with, because this could save you some time and increase your odds of success. Then you should make a list or document which contains pertinent information you need to track.
This is a quick listing of what we should typically track whenever we do outreach at P1P:
- Name of contact
- Date contacted
- Email address
- Social profile/s
- URL of image
- Image type
- Specific image used
- Etc.
Ensuring you will find the best available info on your outreach list will enhance your chances for effective outreach.
Step 4: Outreach
Finally, it’s time for you to outreach towards the webmasters making use of your images.
This most likely sounds simple, but there are several guidelines to bear in mind.
Many people may be enticed to approach this outreach inside a confrontational manner - telling the website owner “you’re using our copyrighted image, you have to take this down”. However, this is actually the wrong approach to take regarding your outreach and can lead to people getting an undesirable knowledge about your brand.
You have to remember that you're representing your brand when outreaching which an amiable and polite approach is better. Something like:

Besides this being an chance to construct a hyperlink, it's also an chance to construct rapport.


4 Comments
Best web hosting in Singapore
Singapore #1 service provider for business email and cloud
Best managed cloud server in Singapore
Best business web hosting in Singapore
Best email hosting in Singapore
SMO Internship in Bangalore
SEO Internship in Bangalore
Digital Marketing Internship Program in Bangalore
wordpress development company